1. Problem
You need to create an
application that changes the user interface depending on the language
and regional settings of the Windows Phone 7 operating system.
2. Solution
You can use the CultureInfo class and its Name property to retrieve the current language and regional settings. Moreover, by using the Resources
files from Visual Studio 2010, you can define constant strings in
different languages that can be shown according to the selected Windows
Phone 7 operating system language.
3. How It Works
Localizing your
application is an important task because by implementing different
languages, you can distribute your application in various markets. Also,
you can obtain automatic formatting of information that differs from
country to country, such as dates, calendars, and money.
Visual Studio 2010 and Windows Phone 7 SDK give you all the necessary tools to easily implement a localized application. The CultureInfo class includes properties and methods to retrieve the current culture set in the user phone (see Figure 1 for the class diagram). An instance of the CultureInfo class is retrieved by using the CurrentThread static property provided by the Thread class. This class is defined in the System.Threading namespace, while the CultureInfo class is defined in the System.Globalization namespace.
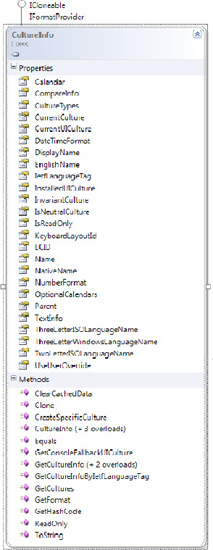
The Name property of the CultureInfo class returns the culture name. This value has a standard format such as en-US, it-IT, fr-FR,
and so on. The name is divided into a lowercase two-letter part that
indicates the language and an uppercase two-letter part that indicates
the country or region. So, for example, the en-US name indicates the English language used in the United States, and the en-CA name indicates the English language in Canada.
By using Visual Studio 2010,
you can add resource files in which you can put strings and constant
values. If you specify the culture name in the resource filename (for
example, the MyResources.fr-FR.resx
filename), you can ensure that those values are automatically used when
the user's phone is set to use French culture and language.
So when you build the
user interface of your application, you should not use fixed values for
text block names, button captions, and so forth, but instead use
resource strings. You have to pay attention to text blocks, buttons, and
general controls showing text because what will be shown in one
language will not be the same in another language. For example, a button
showing the text OK when using English should be sized to contain
different text when another language is selected.
Using Visual Studio 2010, you
have to create an invariant culture resource file that is used by
default when no other localized resources are found in the application,
and that doesn't have any culture specified in the filename. Finally,
you will add a resource file for each culture you want to manage in your
application.
4. The Code
To demonstrate this recipe, you will create the LocalizationDemo
Silverlight for Windows Phone 7 application. Depending on the selected
language and regional settings in the Windows Phone 7 operating system,
the application changes its title, button captions, and image.
So, create a new Silverlight for Windows Phone 7 application and call it LocalizationDemo.
Then select Add New Item from the Project menu and select the Resource
File template from the Add New Item dialog box. You can give your own
name to the file (we chose Resource.resx).
Repeat this operation to add another resource file, but this time you
have to append the culture name and region. In our case, being Italian,
we added the resource file Resource.it-IT.resx.
Specify the same keys in the resource file but with different values. Figure 2 compares the two resource files.
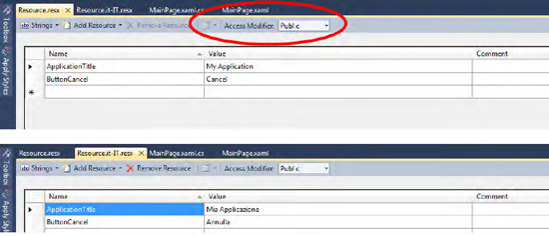
The circled Access Public combo box in Figure 2
has to be set to Public so that Visual Studio 2010 generates a class
for you. This class—which has the same resource filename without the
file extension—can be used directly in your code so that you can specify
resources in the XAML file.
The Resource class (generated from the Resource.resx resource file) is instantiated into the custom LocalizedString class. In the class constructor, a new ResourceLocalizedResource property, is returned to the caller. This class will be used in MainPage.xaml to retrieve keys from the resource file. object is created, and by using the
public class LocalizedString
    {
        private Resource m_LocalizedResource;

        public LocalizedString()
        {
            m_LocalizedResource = new Resource();
        }

        public Resource LocalizedResource { get { return m_LocalizedResource; } }
    }
Before designing
the user interface and specifying resources, you have to inform the
application that you want to use the resources. This is accomplished by
specifying the class name containing the Resource class instance between the Application.Resource tags in the App.xaml file:
<Application
    x:Class="LocalizationDemo.App"
    xmlns="http://schemas.microsoft.com/winfx/2006/xaml/presentation"
    xmlns:x="http://schemas.microsoft.com/winfx/2006/xaml"
    xmlns:phone="clr-namespace:Microsoft.Phone.Controls;assembly=Microsoft.Phone"
    xmlns:shell="clr-namespace:Microsoft.Phone.Shell;assembly=Microsoft.Phone"
    xmlns:local="clr-namespace:LocalizationDemo">

    <!--Application Resources-->
    <Application.Resources>
        <local:LocalizedString x:Key="LocalizedString" />
    </Application.Resources>
. . .
In the MainPage.xaml
page, you add a button and an image control. The image will be changed
depending on the selected language and region in the code, while the
button's content string will be changed automatically by reading the
strings from the resource. To obtain this behavior, you have to specify
to bind the button's content to the ButtonCancel key returned by the LocalizedResource property that the runtime engine can find in the LocalizedString source. The same is valid for the application title that points to the ApplicationTitle resource key.
. . .
        <!--ContentPanel - place additional content here-->
        <Grid x:Name="ContentPanel" Grid.Row="1" Margin="12,0,12,0">
            <StackPanel>
                <Image x:Name="imgBanner" />
                <Button Content="{Binding Path=LocalizedResource.ButtonCancel,
                        Source={StaticResource LocalizedString}}" />
            </StackPanel>
        </Grid>
In the MainPage.xaml.cs file, you define the Loaded event handler, where you use the CurrentCulture property to retrieve an instance from the CultureInfo class. The CurrentCulture property is provided by the Thread class with its own static CurrentThread property. You use the Name property of the CultureInfo class to format the string used by the Uri
class's constructor. This is accomplished in order to retrieve the
localized image you have stored in the appropriate folder. For example,
if the application retrieves the user using the Italian language and
regional settings, the it-IT culture name is used to pick the right image from the it-IT folder created in the Visual Studio solution.
private void PhoneApplicationPage_Loaded(object sender, RoutedEventArgs e)
        {
            CultureInfo ci = Thread.CurrentThread.CurrentCulture;
            imgBanner.Source = new BitmapImage(new Uri(string.Format("{0}/amazon.jpg",
                                                       ci.Name), UriKind.Relative));
        }
5. Usage
Press Ctrl+F5 to
execute the application. The application deploys either on the emulator
or the device, depending on the target output chosen.
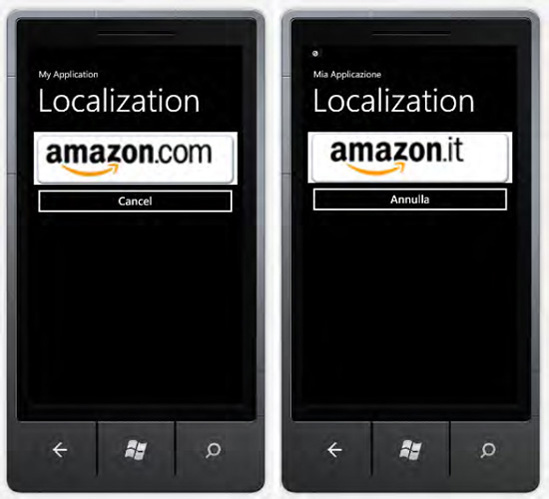
In our case, the
emulator starts with the English language set as the culture, so the
application shows the title, the button caption, and the image taken
from the English resource file (see the left part of Figure 3).
NOTE
This is the invariant
culture resource file, so you will see the English language even if you
chose other unsupported languages such as French or Spanish.
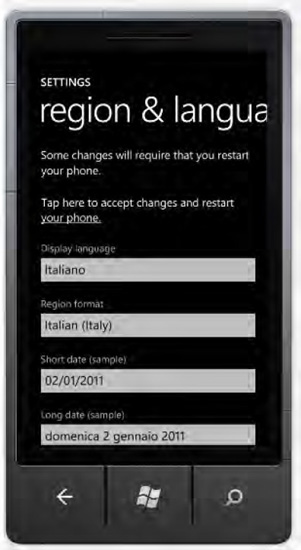
Now go to the Start menu by
pressing the hardware Start button. Tap the top-right circled arrow to
access the application list and then tap the Settings app. From the
Region & Language menu, select the Italiano language. Finally, tap
the Tap Here To Accept Changes And Restart Your Phone link to accept the
new language (see Figure 4).
The phone restarts, and you can go to the application list and again execute the LocalizationDemo application. This time, it will show the Italian language and the localized image (see the right part of Figure 3).